
Getting Started With Python On Termux.
An introduction to Termux and its significance for developers.

An introduction to Termux and its significance for developers.
If you're a techie, and you're fanatic about advanced tools and making tweaks, you might be familiar with Termux.
Termux is an application that gives Android users an ability to explore and perform Linux related operations on Android. Now, you see where the name comes from – Termux, Linux.
This tool is an invaluable tool for developers because of the wide range of features it comes with and what it can be used for. If you're getting started with software development with an android phone, Termux should be a must have for you.
Getting Started as a Python Developer.
Python is an interpreted programming language and it is considered one of the most versatile and advanced programming languages, yet, it still ranks as a beginner friendly language, this is due to its simple syntax which makes code comprehension easy for even non coders.
This programming language has support for hundreds of modules (library of custom codes for various purposes that makes software development easy.) making it easy for newbies to begin their coding journey with.
In this article, you'd learn how to properly set up Termux, install Python on it and write your first program.
Setting Up Termux.
Termux can be installed on Android via three ways:
The first is from Termux's official site. When you visit the site, there you'd find a prompt to download the apk.
Second way of downloading Termux is from The Google Play Store.
Thirdly is from F-Droid. F-Droid is an application that lets android users download open source softwares, it could be modified or unmodified applications. If you really want to get the maximum out of Termux, you should consider downloading from this source or from their official site as the version of Termux on Google Play Store has been stripped of some functionalities due to Play Store policies.
Below is a step-by-step guide to downloading and installing Termux from F-Droid:
- Go to F-Droid's website, download the F-Droid application, and click install.
- Allow install from unknown sources and you're good to go.
- Once the app has been successfully installed, open it and it will automatically update repositories, this will take a few minutes.
- After repositories have been successfully updated, search for Termux and all Apps with the name Termux will be displayed.
The one shown in the image below is what you're to download.
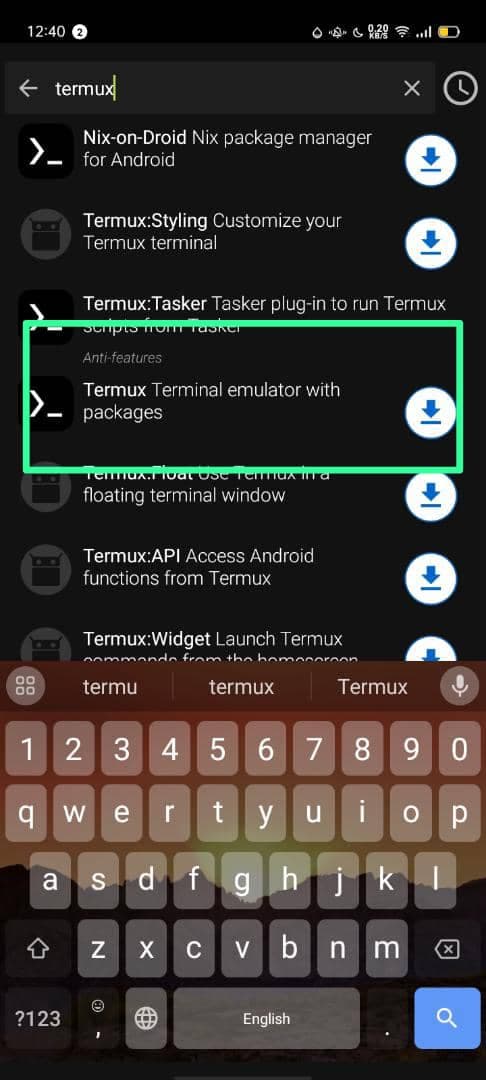
Terminal Emulator for android.
- After downloading, you install it and also, grant F-Droid access to install from unknown sources.
- Open Termux and it will automatically install start-up dependencies.
Now that you've successfully installed Termux on your device, it is now time to install Python. The version of python should be python 3
Installing Python on Termux.
Unlike many development tools for mobile, in Termux, python doesn't come pre-installed and this is due to some reasons.
Termux is optimised for mobile devices, including those with smaller storage space, pre-installing python on Termux will make the application more space consuming. Unlike Linux which comes with most of its packages, in Termux, you have to manually install almost all the packages.
Another reason why Termux doesn't come pre-installed with python is because not all Termux users code with python and to make the app flexible, it's void of coming pre-installed with these programming languages.
Step-by-step instructions for installing Python using the package manager.
Like I wrote earlier, when installing python on Termux or on any software development tool/Integrated Development Environment (IDE), ensure it is the current version of python which is python 3, if you're able to install the most current version of python, do so. One reason for installing the current version of python is to have all new updates and modules.
Use the pkg feature. This feature allows you to install, update and delete any repo or package on Termux.
To install Python on Termux, follow these steps:
Since python is what you're using Termux for, you have to run a test update and upgrade, this is to ensure that everything is working fine.
Type in the following command:
pkg update
pkg upgrade
Remember that Termux runs mainly on Command Line Interface so you have to be knowledgeable about command line interface (CLI) check here for a guide on using CLI.

There are some packages that are required for Termux to run smoothly, to install these packages, run this command next:
pkg install wget curl clang python
After you have done all of the above mentioned, you can then proceed to install python by running:
curl -L https://pyenv.run | bash
python_version=$(pyenv install --list | grep -v - | grep -v b | grep -v a | grep -v rc | sort -u | tail -1)
pyenv install $python_version
pyenv global $python_version
It will take few minutes to install, after you've done that, you can try running your first hello world program or to be sure that everything is in order, you configure the variables of the terminal environment by making an append to the /.bashrc` or `/.zshrc` file
export PATH="$HOME/.pyenv/bin:$PATH"
eval "$(pyenv init -)"
eval "$(pyenv virtualenv-init -)"
When you are done, you should apply those changes to ensure they work on Termux, do so by using this command:
source ~/.bashrc
To check if it is installed and running properly on Termux, type python --version
One thing you must know is that after all of these, a substantial amount of your phone's RAM and storage will be used, so be sure to dedicate at least 500 mb of storage space to python installation, while for subsequent projects, the storage should vary, but a minimum of 1GB RAM is to be dedicated to Termux.
Termux Navigation.
Introduction to the Termux terminal interface: Just like I wrote earlier, Termux terminal uses Command Line Interface which is the opposite of Graphical User Interface (GUI), though, you can run GUI scripts on Termux through modules like Kivy, Django, etc.
Using Termux can only be fun if you have a good knowledge of the commands used in running it. This is why I included it in this article. Let's get to see the fundamentals.
The Basics:
pwd: Used to know the present directory
Is: Shows the files and folders in a current directory. Adding Is -a will reveal hidden files.
cd storage: Used to move in a folder.
rm -rf [name of folder]: Used to remove folders and all files inside it.
cp [name of file path of file] Copy a file. i.e cp joseph.py /0/storage.emulated/termux/python. Observe the spacing.
mv [name of file path of file] Used to move a file. Follow the example above.
pkg search: Used to search for the availability of a package.
pkg install: Used to install a package.
got clone[project link] Used to download projects from GitHub.
wget[link]: Used to download any file online.
clear: Used to clear your screen
For a comprehensive list of Termux basic commands, check here.
Writing Your First Python Script.
Now that you've successfully installed Python on Termux, you can proceed to write a simple Hello World program. Type in python on the terminal and it will automatically start python.
Create your python file by typing in $nano (file name).py i.e $nano joseph.py, this will create a file named joseph.py and also open the editor.
Write your code and run it by typing $ python joseph.py then press enter, this will run your code.
To save, press Ctrl + s. To exit the editor, press Ctrl + x.
Now, you're good to go! You've successfully written your first python code on Termux.
If you're a beginner, try starting out with normal projects to build your knowledge in python easy to use syntax, then you can start working with modules of your interests.
In conclusion, running python on Termux can be a bit challenging for newbies, but with constant practice, you'd become very familiar with it.
You can check out Python's official site or sites like W3schools.
Also, check Termux's documentation for a comprehensive and overall insight on using Termux. Note that this documentation isn't focused on Termux with Python, but can serve as a valuable insight.
Share this article
Related Articles

Deploying a Node.js Application on AWS Using Coolify
"Deploy your Node.js application to AWS Lightsail with Coolify, complete with custom domain integration."
Ugochukwu Paul
1 year ago
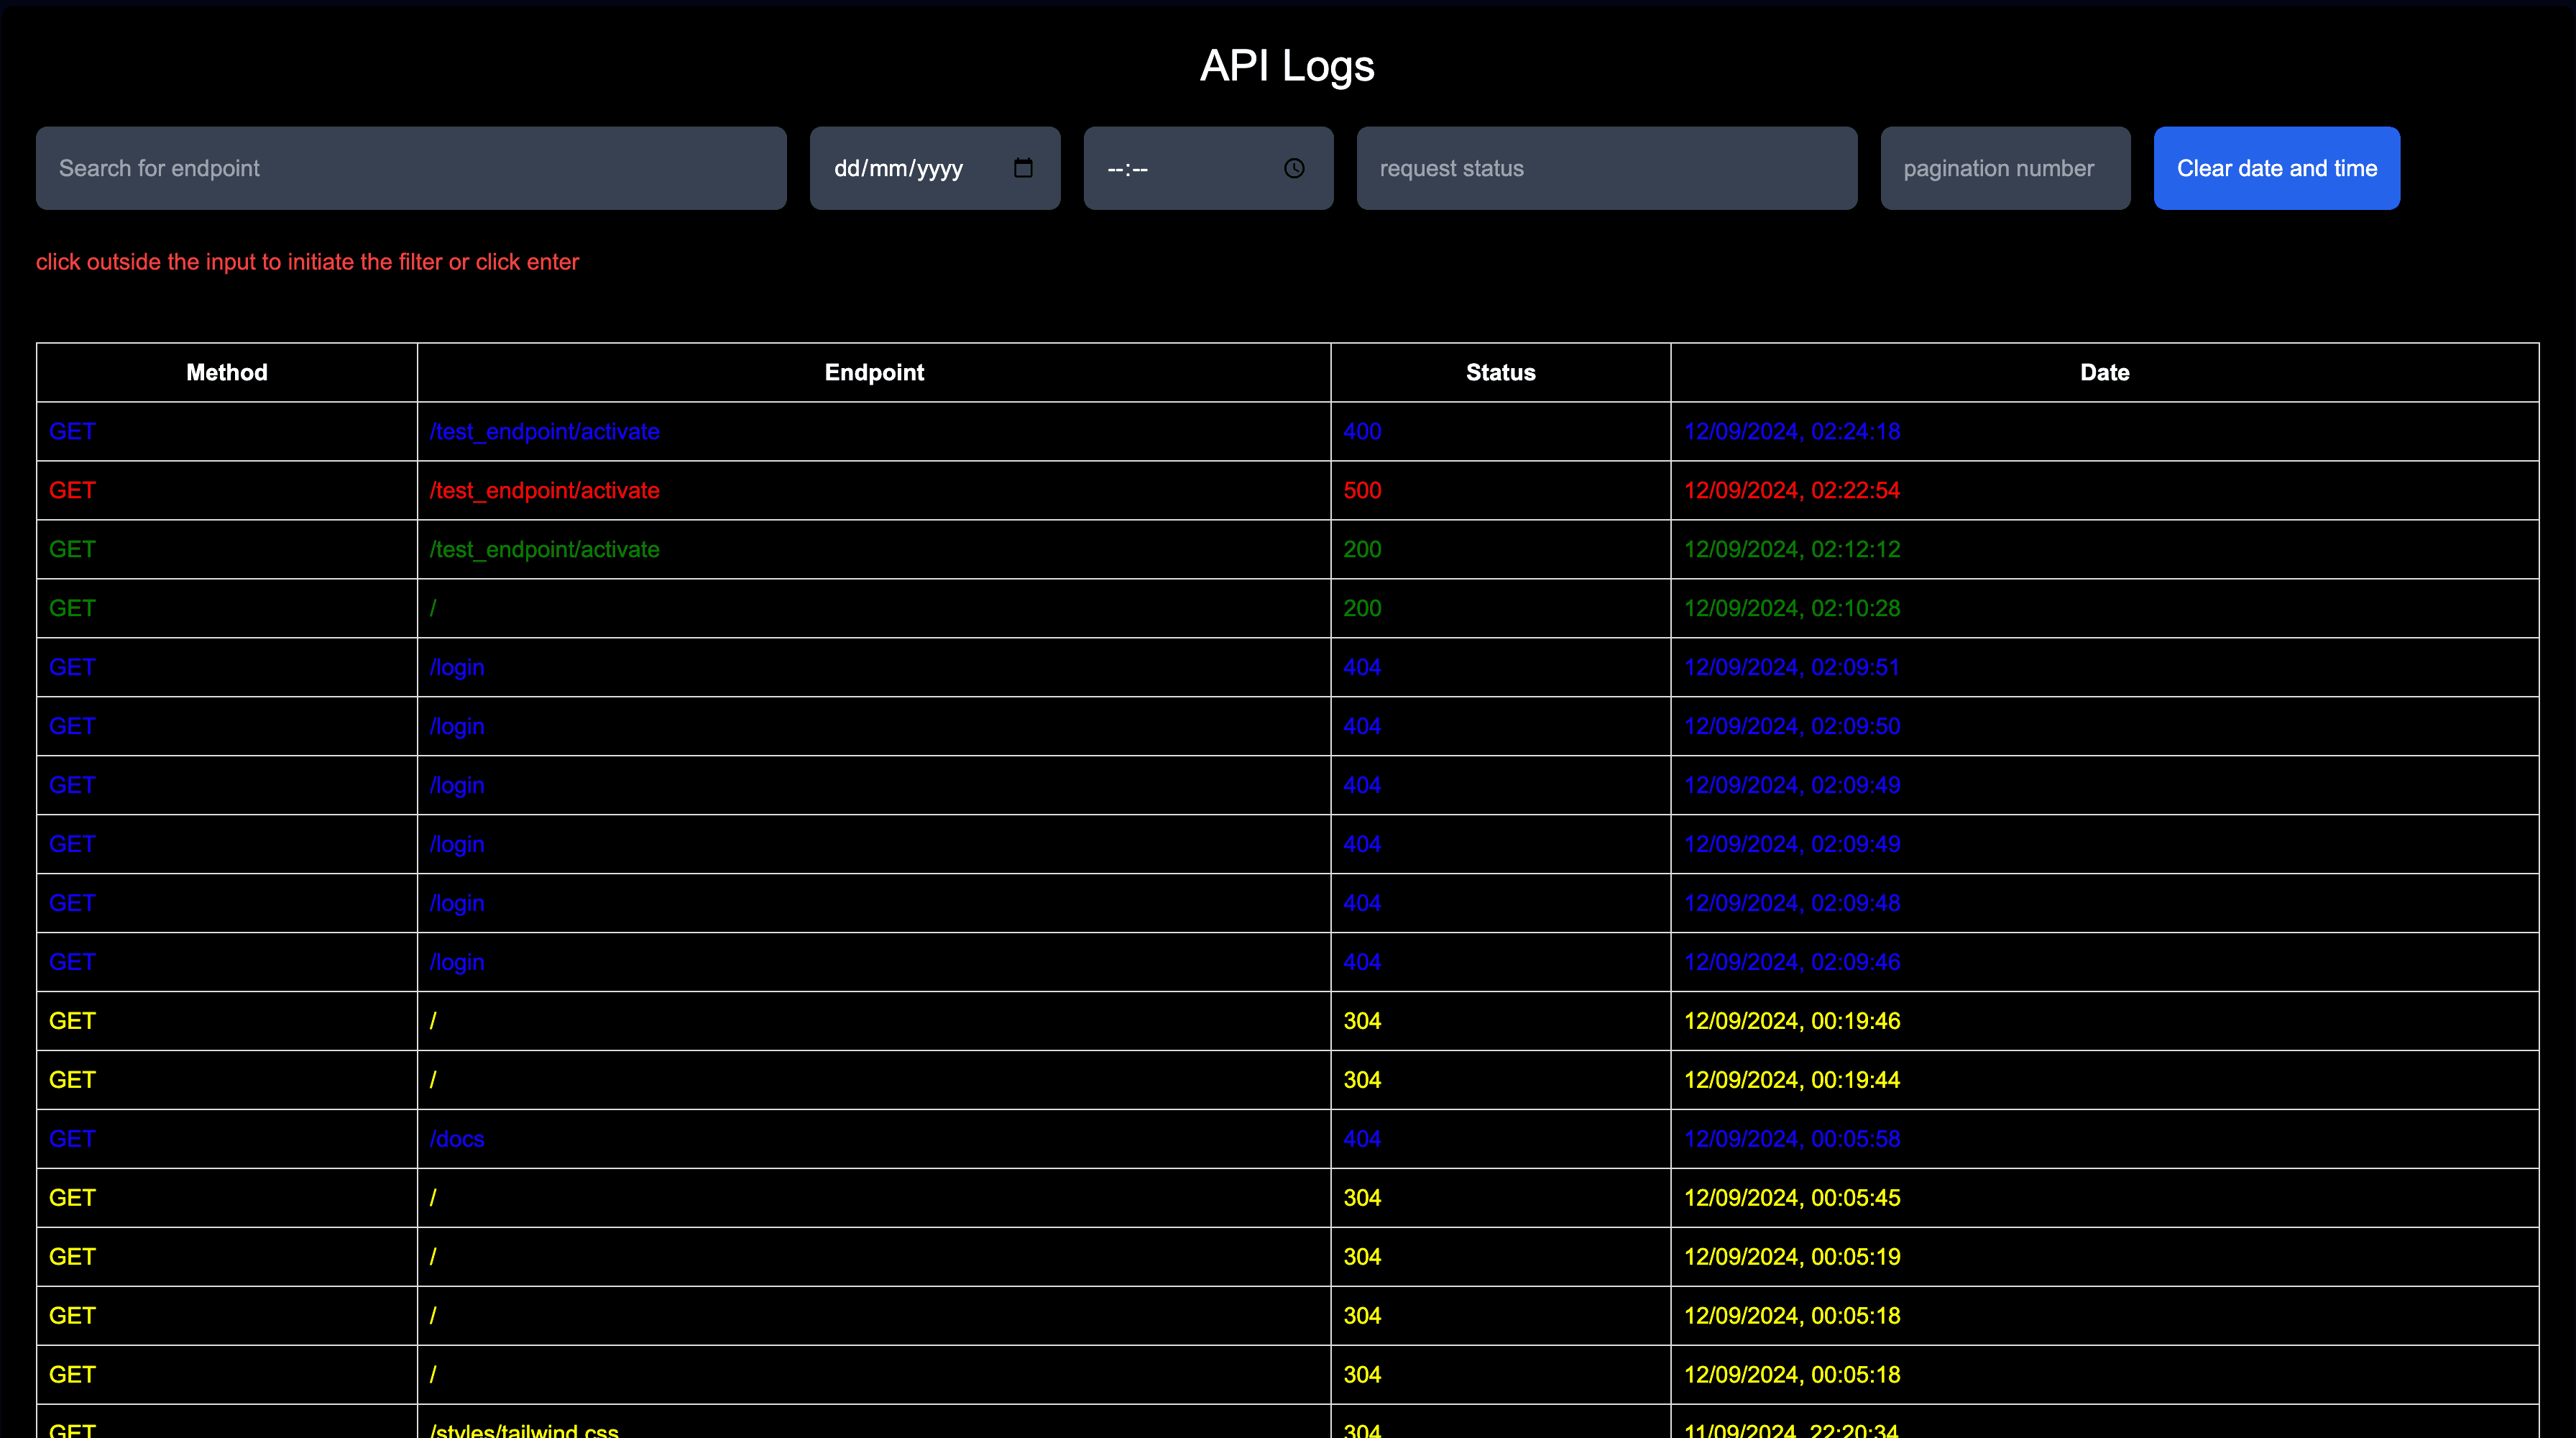
Node.js API Monitor: How to Track API Logs for Free
Learn how to monitor API logs in Node.js for free. Store and search requests easily, with additional features to enhance your API monitoring.
Ugochukwu Paul
1 year ago

How to Perform a Basic Security Audit on Your Computer
Learn how to perform a crucial personal computer security audit to protect against cyber threats in your computer. Strengthen your defenses with steps like software updates, password management, antivirus software, and more. Take control of your cybersecurity today!
Joseph Chisom
1 year ago